Pricing your products as a new company is the number one important step in starting your business without a storefront. Pricing can make or break your business. You must account for all costs associated with producing your product, including overhead, ingredients, and most importantly, your time. Your time is the most underrated part of pricing out your products for a bakery and cake business. You must not undervalue the effort that you put into handcrafting the products for your customer.

Your Time
As a cake and bakery owner, you must always remember that a customer is buying the product because they want the handcrafted value that you provide. Customers can get baked products at any store.
Machines make these products in mass production. Your product is made with valuable ingredients and handcrafted individually for your customer. Each product is custom made for the customer, which means you should be charging for your expertise and time.
Before you can begin pricing your products, you need to determine what you want to pay yourself for your time and experience when crafting your product. Do you want to charge $13, $15, $30? This value is something that you must determine.
You will come back to this value time and time again. The first time someone says, “well, all you did was make some cupcakes.” Remember that your time and expertise in handcrafting the product is valuable; otherwise, your customer can just go to the local grocery store.
If a customer does not value your time, then they are not your ideal customer. You will need to determine your hourly rate and multiply that by the amount of time it takes to complete each of your recipes.
Listen to “Episode 4: Price Your Cakes To Make Money” on Spreaker.Ingredients
All products are going to require you to cost out the individual ingredients of a recipe. The key to successful pricing and costing for a recipe starts with precision baking. What is precision baking? Go here to learn the value of precision baking. Precision baking is the use of weight in a recipe to accurately bake your products consistently each time you prepare the product. Knowing the exact ounces for your recipe will help you accurately price your product.
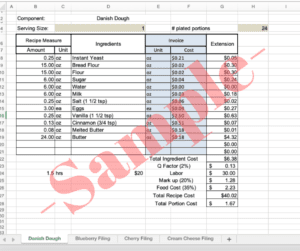
For each of your recipes, you will need to find out the exact cost of the ingredients in the recipe. We have an easy worksheet that you can learn how to use here to cost all your recipes quickly. If you would rather figure out the pricing yourself, then follow the directions below to cost out each ingredient on the recipe.
- Convert your recipe into ounces
- Determine the cost per an ounce of your ingredient from the store
- Multiply the number of ounces in a recipe for each ingredient to the cost per an ounce of that ingredient
Ok, I know this sounds like a lot of work, so we are here to help you. You can grab our recipe pricing worksheet here and our free Recipe Costing Sanity Saver guide here to price out each of your recipes quickly. We use this in our business without a storefront for both our direct to customer pricing and our wholesale pricing. Learn how to quickly price out recipes with our worksheets here.

Are you on the fence about whether our pricing tool is the right fit for you? We get that. That is why we created this short video here show casing some of the pricing tool for you. Once you purchase the pricing tool, we provide you the full 9 minute video so that you can get started with controlling your pricing immediately.
Accounting For Cost Variances
As a small business without a storefront, you are not always going to have the time nor the need to purchase in large quantities. This means that sometimes you may pay more for your ingredients compared to the cost accounted for in the recipe pricing. When you create pricing, you want to build in variance for this fluctuation.

You will also want to account for variance in the fluctuating costs of butter, milk, and flour. These ingredients can have significant changes in costs throughout the year. Adding a percentage for variation will help you recoup these costs. When we price our products, we build in a 35% food cost mark-up to allow us to recoup in variation in our costs for ingredients. This helps us to account for making quick runs to the local grocery store or the unexpected increase in the cost of fruit or butter.
Now instead of you trying to manually add an additional 35% increase to your pricing for your recipe, you could easily use the recipe pricing worksheet here that we developed to capture pricing for both our direct to customer sales and our business to business sales.
Account For Cost Of Material To Produce Product
Now when you are baking your product, there are many different items that you may use that you do not include in your ingredients list for the product. These are muffin liners, cooking spray, gloves, and other items used to create the product. Even though you are not specifically listing the costs of these ingredients on your recipe, you will want to account for your costs.
For our pricing, we add a 2% mark up for our Q-factor or for the items that we need to produce our product. You will want to include this mark-up in your pricing to make sure you capture the costs for producing your products.
Again, you can create your own spreadsheet for pricing or just grab our recipe pricing worksheet here. This guide includes the Q-factor mark up for all products.

20% Profit Mark Up
Most business professionals will agree that you want to aim for a 20% profit mark up on all your products. This is where you will gain your profits to make money for your business without a storefront. This mark up occurs after you have accounted for all your costs associated with your product. This will give you the final price for your item based on your recipe.
The last step will be for you to divide the final price by the yield of your recipe to determine the price for 1 item. Once you have the price of one item, you can determine in what quantity you want to sell your product.
If you want to take the time to build your own worksheet to cost our recipes and determine your pricing instead of just grabbing ours here, then set your worksheet up with the following info.
- Determine the cost of each ingredient in the recipe
- Multiply the total costs by your Q-factor
- Add your hourly wage (make sure you know the number of hours to complete a recipe)
- Add your 20% profit mark up
- Add your 35% food variance mark up
- Gives you your total recipe price
- Divide that by your recipe yield to determine the cost per an item
Now if this sounds confusing, I promise it is not, but building your own worksheet would be a waste of time. It is quick and easy to convert all your recipes using our recipe pricing worksheet here and our FREE Recipe Costing Sanity Saver guide here.
Read all the great advice that we have on running a bakery business without a storefront here.


Comments are closed.